07 – Dictation
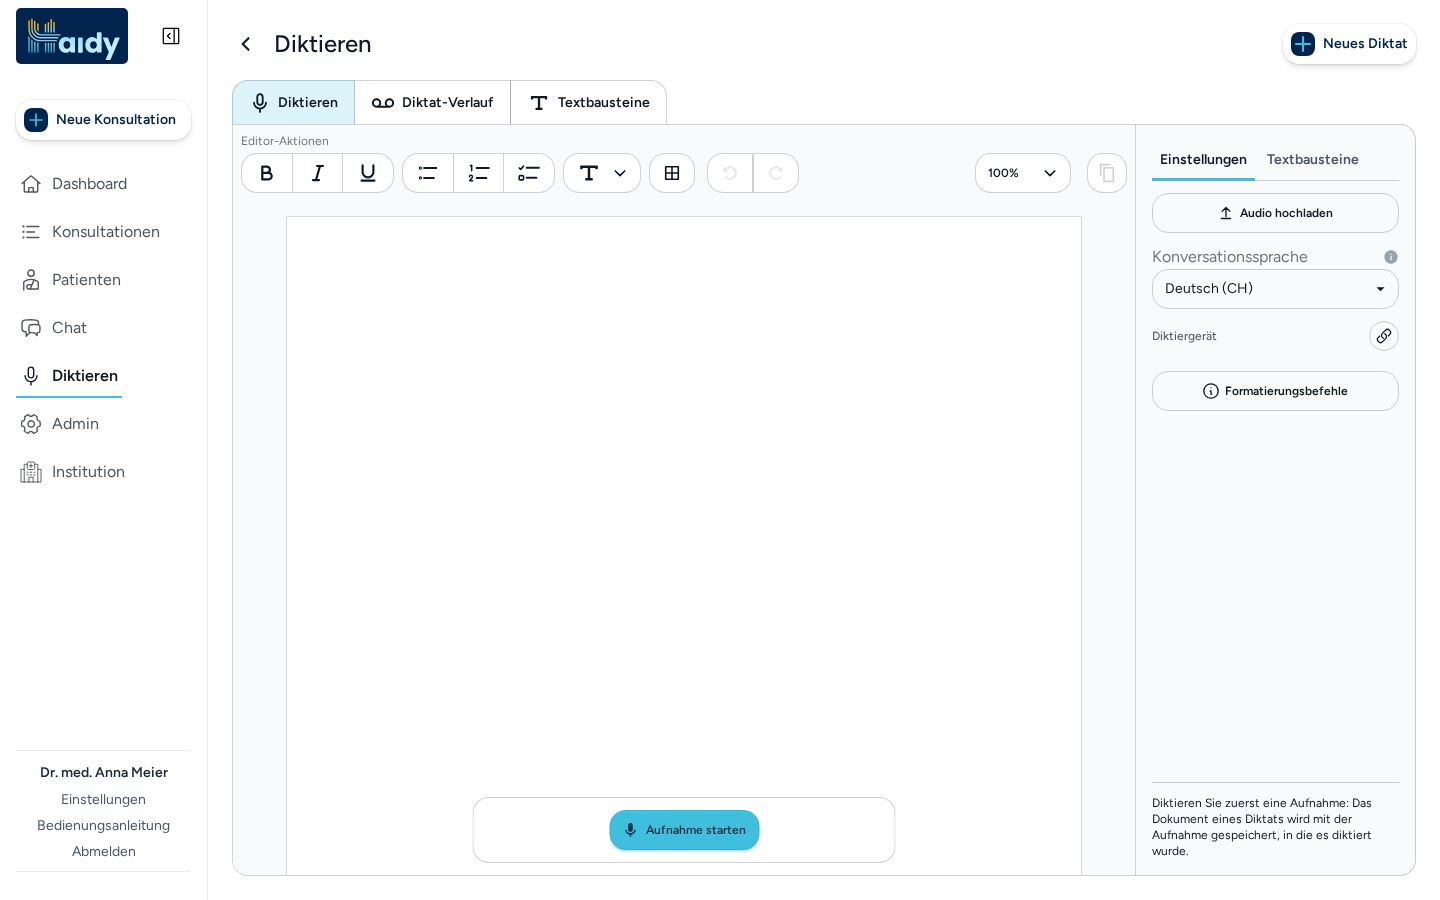
The “Dictation” area is a quick dictation tool: you dictate a text and Haidy transcribes it – without having to create a full consultation beforehand. What you dictate is saved as a dictation, together with its recordings, so you can open it again later. A recording can also be used as the audio of a consultation (chapter 04).
The page has two tabs at the top: “Dictate” (the editor) and “Dictation History” (your saved dictations and recordings, sections 7.4 and 7.5). The dictations and the recordings share one list, which you can filter.
7.1 Starting a recording
- Click on “Start Recording” (button with microphone icon below the editor).
- Speak your text.
- Stop the recording with “Stop & Transcribe” (while recording you can also “Pause”/“Resume” or “Discard” the recording).
The transcription appears in the editor. You can edit the text directly there; the toolbar is the one of the report editor.
Haidy creates a dictation from the first recording and saves every change automatically – the status at the bottom of the settings area reads “All changes saved”. The header above the editor shows the dictation’s title, date, duration, microphone and tags; “Edit dictate” lets you rename it and assign tags. Every further recording is appended to the open dictation.
To start the next dictation, click “New dictation” at the top right of the page. Haidy first saves the open dictation and only asks for confirmation if changes cannot be saved.
As soon as the transcription is ready, Haidy names the dictation itself from the transcript (see section 7.5) and the title appears in the header without a reload.
The dictation is written on an A4 sheet that grows with the text: a long dictation continues on the next page and the area around the sheet scrolls, so text no longer runs off the edge of the page.
Above the editor you can play back the recording the dictation was made from, to check the text against the audio.
7.2 Uploading audio
As an alternative to the live recording, you can have an existing audio file transcribed:
- Click on “Click or drag and drop” in the right-hand area or drag the file into it.
- Supported formats:
MP3, WAV, M4A, MP4, WEBM, DCT. DCT files come from dictation devices; encrypted DCT files cannot be read.
An uploaded file is transcribed as a whole recording, not as a dictation: the transcript is laid out in paragraphs instead of being returned as one block, and the recording carries no microphone name.
7.3 The right-hand area
The right-hand area has two tabs: “Settings” with the recording controls and “Text blocks” with your reusable texts – the same way the chat sidebar is divided.
Settings
| Setting | Description |
|---|---|
| Upload audio | Transcribe an existing audio file (see section 7.2) |
| Conversation language | Language of the dictation (e.g. German); starts with your dictation language from the settings (see section 8.1) |
| Formatting commands | Lists the spoken formatting commands of the selected language (see below) |
| Microphone | Selection of the recording device |
| Dictation device | Pairing of a professional dictation microphone (see section 7.6) |
| Download desktop app | Link to the Haidy desktop app (for extended dictation functions) |
Formatting commands
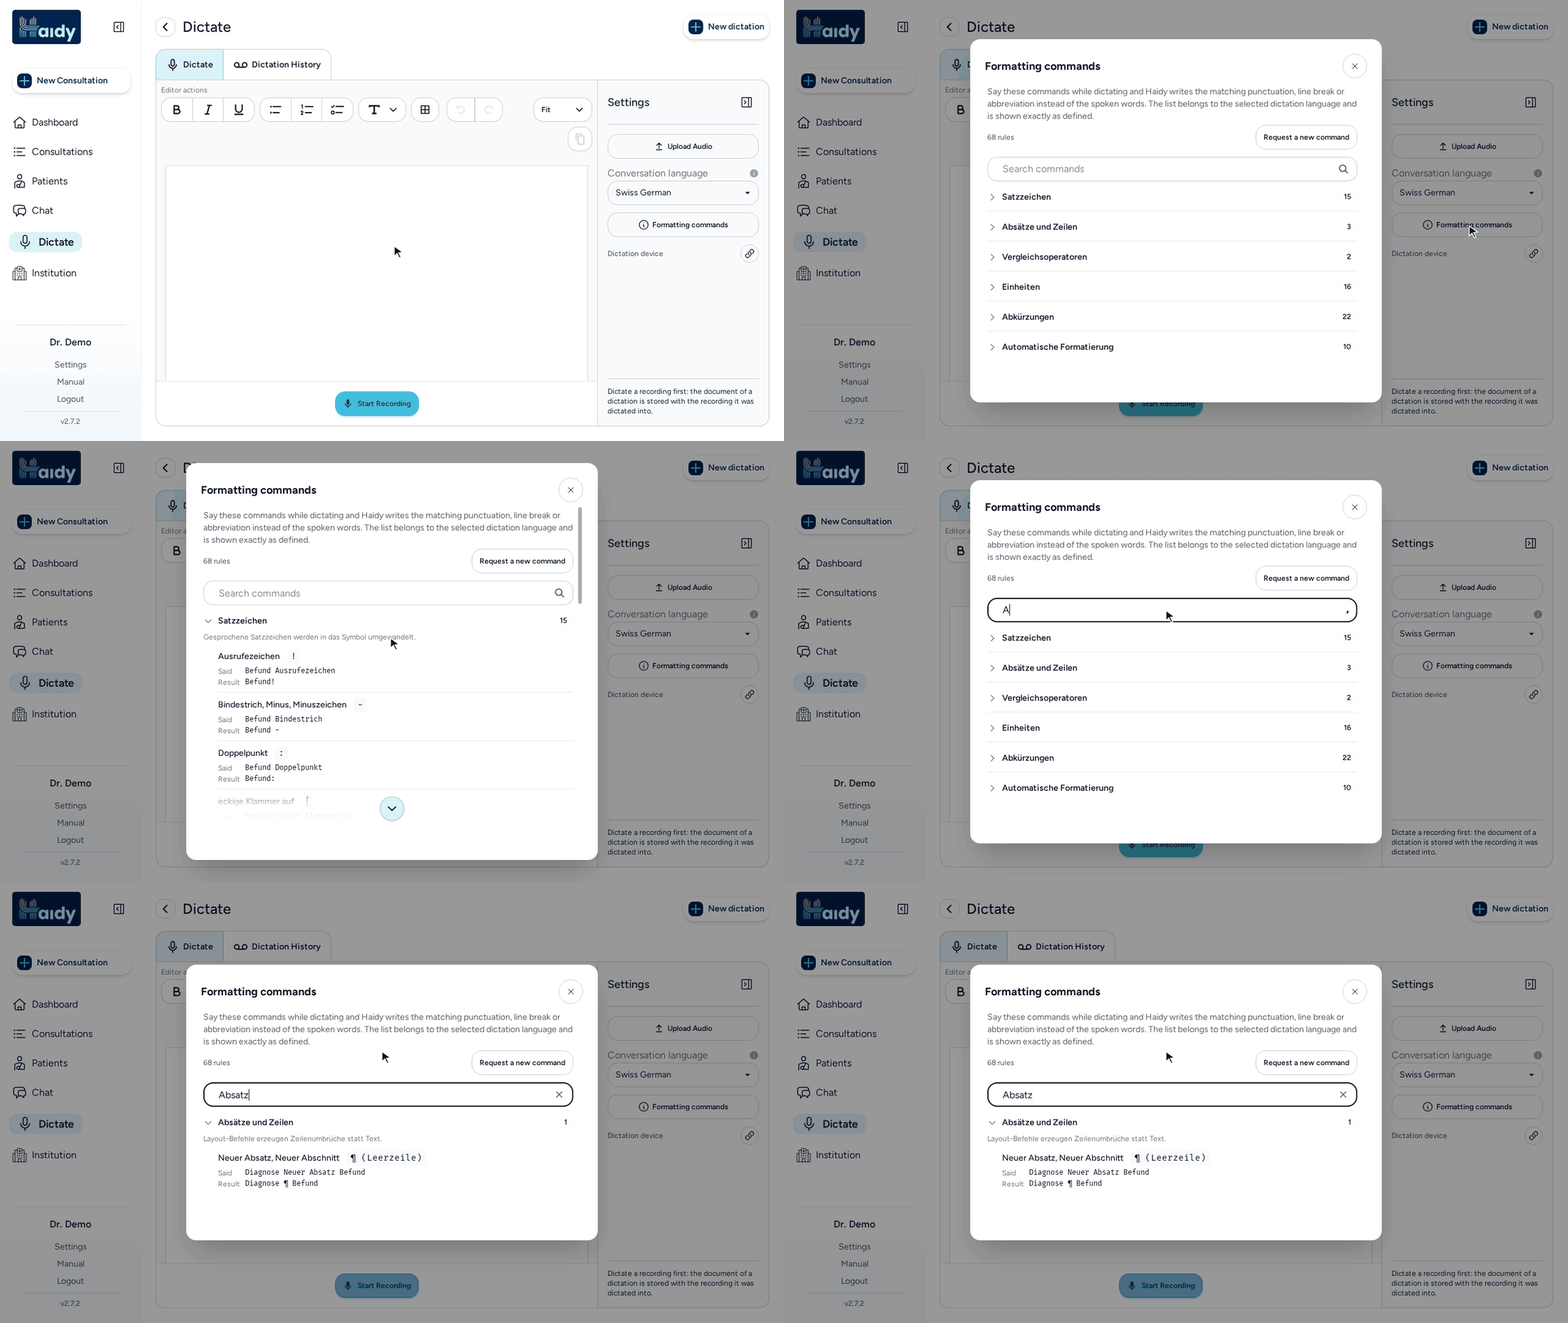
The “Formatting commands” button at the bottom of the “Settings” panel lists the spoken commands Haidy understands while you dictate: say the command and Haidy writes the matching punctuation, line break or abbreviation instead of the spoken words. The button only appears if commands exist for the selected language – currently German, including German (CH).
The commands are grouped into collapsible categories; “Search commands” finds a command and opens the matching categories. Each entry shows what you say (“Said”) and what Haidy writes (“Result”). If a command is missing, describe it under “Request a new command”. Please do not include any patient data.
Text blocks
Text blocks are texts you use again and again, for example a normal finding. They live in the “Text blocks” tab of the right-hand area; “Search text blocks” finds one by name.
- Insert: click “Insert” or say the voice command shown on the card, for example “EKG einfügen”. The text block is added as its own paragraph.
- Fill blanks: a text block marked “Blanks” has gaps. After inserting it, dictate only the missing values – your next dictation fills the blanks.
- Unclear command: if Haidy is not sure which text block you meant, it asks “Which text block was meant?”. Pick one, or keep the words with “Keep as text”.

With + (“Add text block”) you write your own text block: a name, an optional “Voice command” and the text, with gaps added via “Insert blank”. Two text blocks cannot have the same voice command.
If you used auto-texts in Dragon, bring them along with “Import from Dragon” (upload icon): upload the export from the Nuance Management Center (XML or JSON), check the list and import the entries you want.
7.4 Dictation history
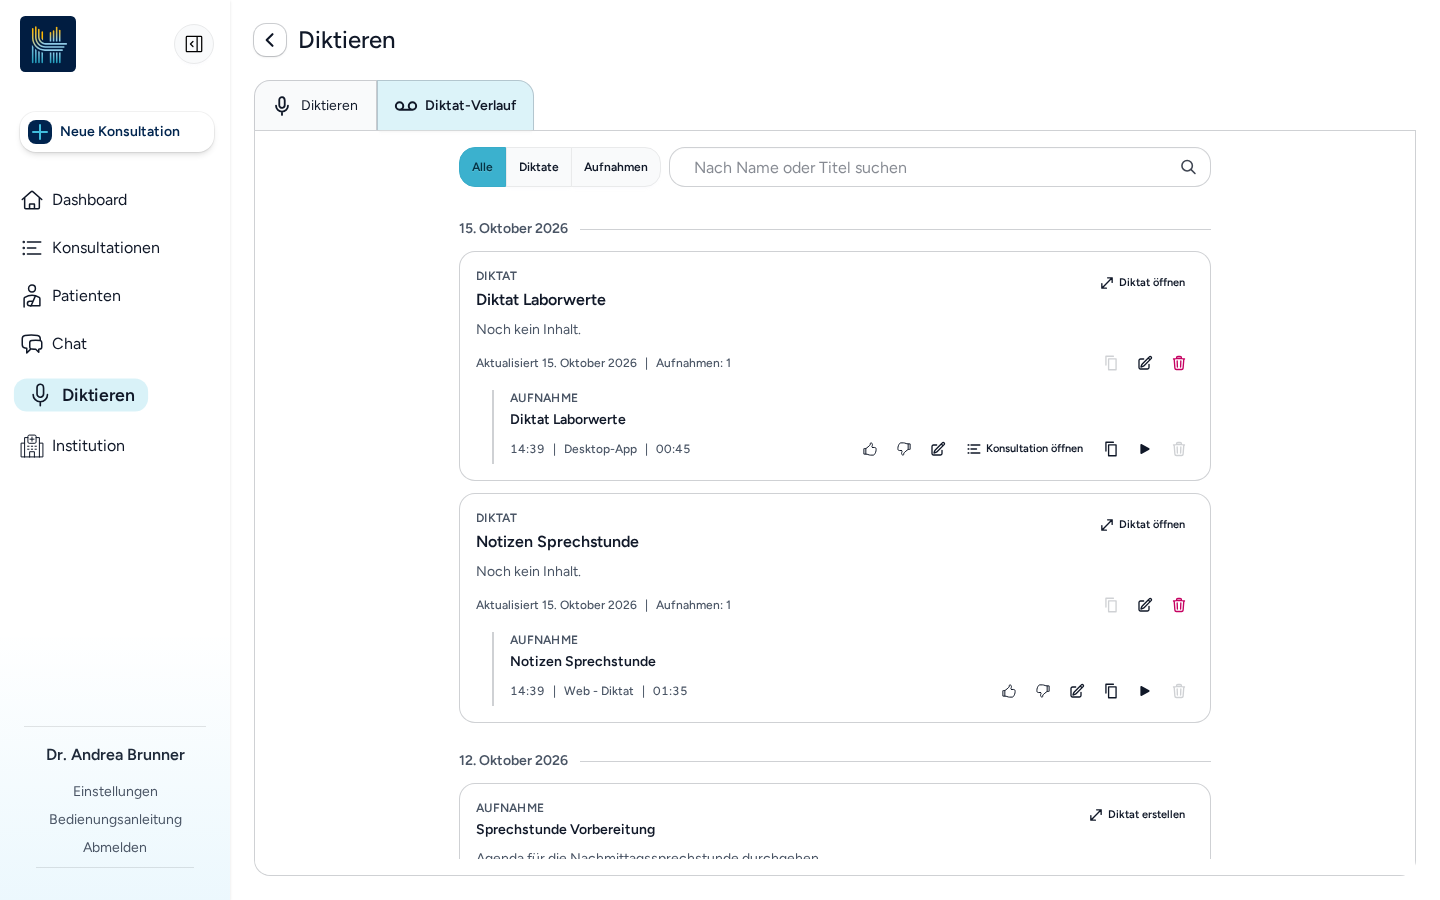
The “Dictation History” tab holds your saved dictations and your recordings in one list – newest first and grouped by day. The “Filter history” switch narrows the list to “All”, “Recordings” or “Dictations”. Every recording is listed under “Recordings”, including the ones a dictation was created from – those carry the action “Part of dictation “…”” (see section 7.5). If the filtered list is empty, Haidy shows “No recordings yet. Record or upload an audio file and it will appear here.” or “No dictations yet. Record or upload an audio file and it will appear here.”
| Element | Meaning |
|---|---|
| Title | The name of the dictation. Haidy generates it automatically from the transcript (see section 7.5); until it exists, the default is “Dictation” and its date. Below it the first lines of its text |
| Updated / Recordings | When the dictation was last changed and how many recordings it holds |
| Open | Loads the dictation into the editor, where you can continue dictating or editing |
| Edit | Changes the title and the tags of the dictation |
| Delete | Removes the dictation after a confirmation |
The search field “Search by name or title” filters the list by name, title, tags and text; clear it again with “Clear search”. For recordings, only titles are searched, so a recording without a title is hidden while a search term is entered. If nothing matches, Haidy shows “Nothing matches ‘…’.”
7.5 Recordings in the history
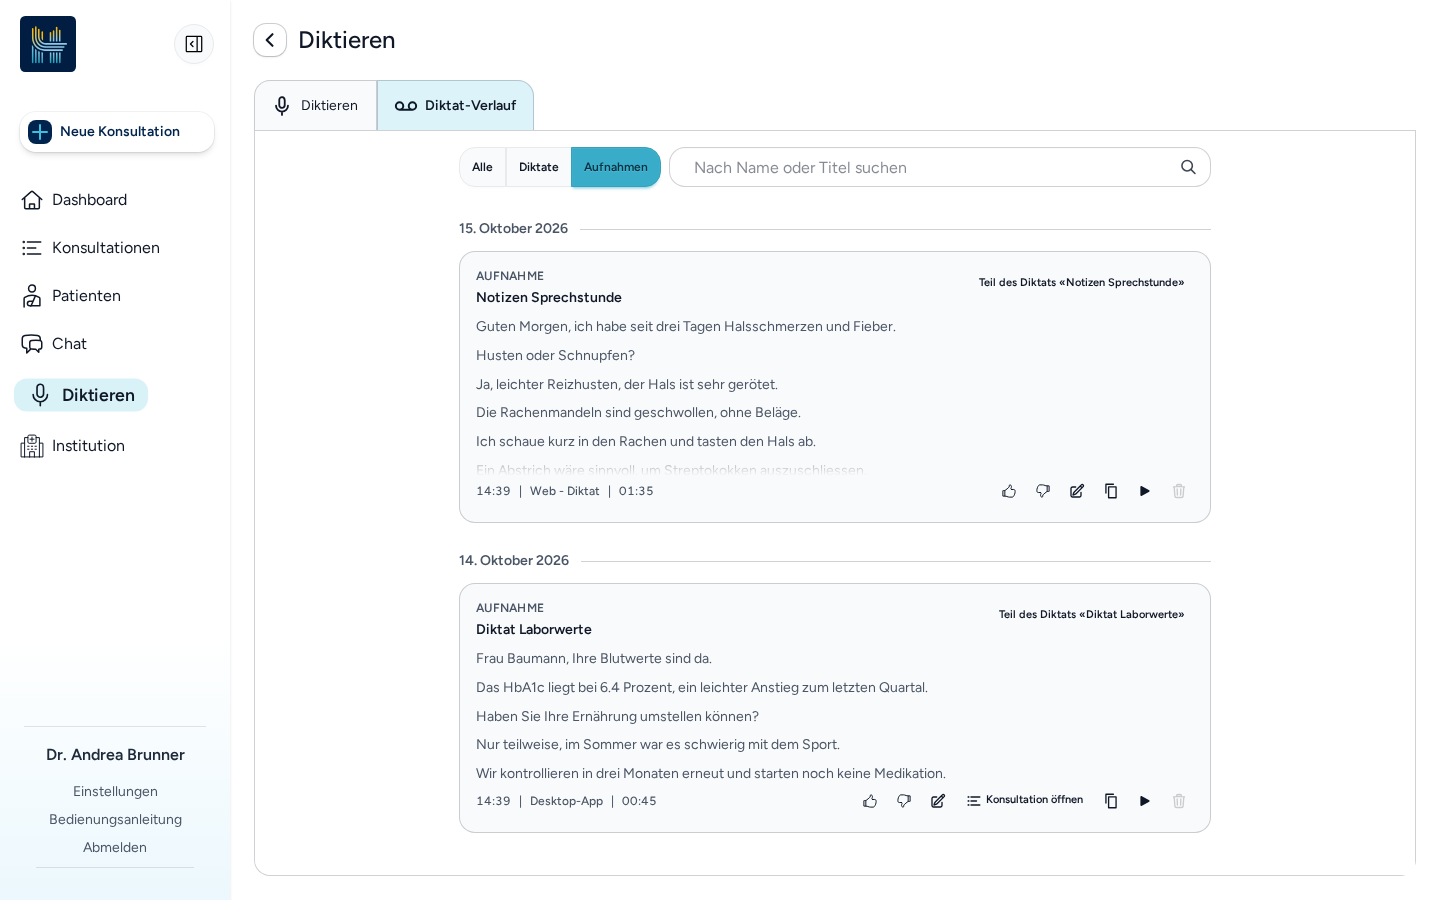
Your recordings appear in the same “Dictation History” list (filter “Recordings” and “All”) – newest first and grouped by day:
| Element | Meaning |
|---|---|
| Date heading | Day of the dictations listed below it (e.g. “17 September 2026”). Haidy uses the date on which the recording was made; if the device does not report one, the upload date is used |
| Title | The name of the recording – generated automatically from the transcript (see “Automatic titles” below) or set by you. If no title is set, the beginning of the transcript is shown instead |
| Text | Transcription of the recording. Long texts are shortened |
| Time | Time of the dictation |
| Source | Where the dictation was recorded: Desktop App, Desktop - External Mic, Smartphone, Web - Dictation, Web - Instructions, Web - Report, Chat, Web or Dictation |
| Tags | The institution tags assigned to the recording, shown as coloured chips |
| Copy to Clipboard | Copies the text to the clipboard. The action is disabled as long as there is no transcript – for a recording Haidy explains it with “This recording has no transcript, so there is nothing to copy.” |
| Duration | Length of the recording (e.g. 0:42) |
| Play recording | Plays the recording – the button only appears as long as the recording is still stored. If the audio output fails, Haidy reports “Playback failed. Please check your audio output device and try again.” |
| Open | Writes the recording up as a new dictation and opens it in the editor |
| Edit | Opens the title and the tags of the recording for editing |
| Delete | Removes the recording from the history after a confirmation – it cannot be restored |
| “Open consultation” | The recording belongs to a consultation; the button opens that consultation, and the recording cannot be deleted on its own |
| “Part of dictation “…”” | The recording was used to create a dictation; the action opens that dictation. As long as the dictation is not loaded yet, the action is disabled and reads “Part of a dictation” |
“Load more” loads the next entries. Recordings that were made directly in the report editor or as instructions are not listed. A recording that belongs to a dictation is listed as well: its card is tinted, and it carries the action “Part of dictation “…”” that opens the dictation.
A recording that belongs to a consultation can be played by anyone who can open that consultation, not only by the person who recorded it.
Rating a transcription
A recording's transcription can be rated with thumbs up (“Helpful”) or thumbs down (“Not helpful”). A rating opens a dialog for an optional comment and can be removed again with the X. The rating is about how well the recording was transcribed, not about a report.
Automatic titles
Once a recording has been transcribed, Haidy names it from the corrected transcript – at most four words that name the main medical problem or diagnosis (or the subject, if the text is not medical), in the language of the transcript and without the names of people. If the transcript is shorter than five words, Haidy uses a generic title such as “Short transcript” instead of asking the model.
Haidy only names a recording that does not have a title yet – a title you set yourself is never overwritten.
Naming and tagging a recording
Use the “Edit” action of an entry, or the “Edit dictate” button in the header above the editor, to name and tag a recording:
| Element | Description |
|---|---|
| Title | Your own name for the recording – shown as the heading of the entry. Up to 255 characters. The placeholder “Add a title” reminds you that the title is optional; leave the field empty and save to remove an existing title |
| Tags | The tags of your institution. Several tags can be selected at once; the selection always replaces the previous tags, so deselecting all of them removes the tags. Up to ten tags can be assigned to a recording |
| Save | Saves the title and the tags |
| Cancel | Discards your changes |
Haidy confirms a saved title with “Title updated”. If something goes wrong, Haidy reports “Failed to update the title. Please try again.” or “Failed to update the tags. Please try again.”.
Tags are created and maintained in the institution administration (section 10.9).
7.6 Dictation microphones (SpeechMike, PowerMic, foot controls)
Haidy supports professional dictation microphones – for example the Philips SpeechMike / SpeechOne, the Nuance PowerMic and foot controls. They are supported in Chrome and Edge and must be connected to your computer before you pair them.
- Connect the dictation microphone or the foot control to your computer.
- Click the link icon next to “Dictation device” in the right-hand area.
- Confirm the browser prompt that asks for access to the device.
Once the device is paired, you can control the dictation with its buttons:
| Button | Function |
|---|---|
| REC | Starts and stops a recording |
| STOP | Stops the recording |
| Back / forward | Moves the text cursor word by word while editing |
| EOL | Jumps to the end of the paragraph |
If a dictation microphone is connected, its built-in microphone is preferred for the recording, and its LED shows whether a recording is currently running. The same control is available everywhere you dictate – on the Dictation page, in the consultation recording (chapter 04), in the report editor and in the chat (chapter 06).
Note: If a dictation microphone is connected but not yet paired, Haidy shows a one-time notice pointing you to the link icon. The pairing is stored in the browser, so it usually survives a reload.
7.7 Using a recording in a consultation
A recording from your audio history can be used as the audio of a consultation: in the Input step of a new consultation, switch to “Select audio” and pick the recording (see chapter 04). The consultation is then linked to the recording.
Tip: Detailed information on hotkeys and dictation mode can be found in the settings (chapter 08).